Playing, Part 1 · Chapter 7: Major Scales and Keys
Building Major Scales
We are now going to build a C major scale, using a specific sequence of whole steps and half steps: W = whole step H = half step
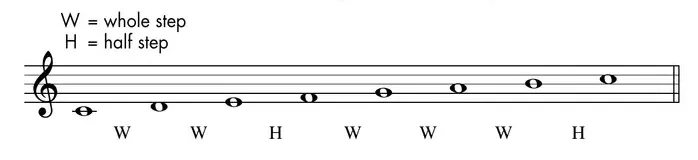
It just so happens that when we construct this pattern of intervals starting on the note C, we use all the remaining white keys on the keyboard. The C major scale is a “white keyonly” scale. As we’ll see, if we start this pattern of intervals from any other note, we’ll end up with a mixture of white and black keys. The major scale is a seven-note scale (i.e., there are seven different pitches), and we have used all the letter names in the music alphabet, consecutively (with no letter name being used more than once).
W = whole step H = half step W = whole step Play the notes of this scale on your piano, and get the sound “in your ear.” Don’t worry H = half step too much about fingerings for the moment—we’ll cover those in just a minute.
The major scale should be a familiar and recognizable sound. My former mentor Dick Grove (one of the greatest American contemporary music educators of the 20th century) was fond of saying that the major scale “came over on a boat from Europe.” In other words, it was a pre-determined set of intervals that your “inner ear” already understood, assuming you had some exposure to mainstream tonal music. Now we’ll build this same pattern of whole steps and half steps from F, to create the F major scale:

Notice that we now have the note B♭ as the fourth degree of this scale. This is because we need a half step between the third and fourth degrees. B will be the next letter name after A, and thus the black key that we need to get our half step up from A will be called B flat. Next we’ll use W = whole step H = half step the same method to build a G major scale:

Notice that we now have the note F♯ as the seventh degree of this scale. This is because we need a whole step between the sixth and seventh degrees, therefore, a black key is needed. We also know that the next letter after E is F, and the black key associated with this F should be called F sharp. There are many more major scales, but for now, these three should get you started. In order to use the scales for playing songs, we first need to learn how to play them with the proper fingering.
Why Do I Need to Play Scales? Yes, yes, I know… playing scales doesn’t seem very exciting, and you might be thinking, “Gee, I just wanna get to the fun stuff!” But wait! Don’t turn the page just yet, because knowing and playing the scales will greatly benefit your piano performance, whatever styles you are interested in. So what are the benefits to playing scales, anyway? Several, actually:
- They are great for building technique on the piano. Whether you’re playing Beethoven or Jerry Lee Lewis, you’re going to need piano technique!
- The thumb turns needed to play scales are very good practice for the hand position changes needed when playing songs (coming up very soon).
- A lot of classical pieces and pop songs contain scales or portions of scales in their melodies. Having these sections already “under our fingers” is a great asset—it’s like we know that part of the tune already! Major Scales with Fingerings The following shows the C major scale, with fingerings.
It’s helpful to break the scale fingerings down into fingering groups, starting with the thumb: in this case 1-2-3, then 1-2-3-4-5. As you practice this scale with the fingering shown, make sure you keep the back of your hand straight and parallel to the keyboard, with the fingers curved. After the thumb plays C, it right away begins to turn under and cross behind fingers 2 and 3 so it is ready, in place to play F, right after E. As the thumb is playing F, fingers 2, 3, 4, and 5 line up with G, A, B, and C. Executing this thumb turn ahead of time, and lining up the rest of the fingers will help keep the scale “running” smoothly, without pause. To descend back to the starting point, everything runs in reverse. As the thumb is playing F, finger 3 crosses over to land on E, and then fingers 2 and 1 finish up on D and C. Now it’s time to get the left hand involved with the C major scale:

Just like with the right hand, here we can break the fingerings down into fingering groups: 5-4-3-2-1, and 3-2-1. Everything here is just like the right hand, but in reverse. With the left hand, we cross finger 3 over on the way up. On the way back down we have our thumb turn under after the first three fingers are played. Remember to get the thumb turning ahead of time to keep the scale running smoothly. The same fingering works for the G major scale. The only difference is we have to play a black key as we learned a bit earlier. The scale is notated below on the grand staff so you can practice with your right and left hands (separately, for now).

The F major scale uses the same fingering for the left hand, but because of where the black key lies, we have to use a slightly different fingering for the right hand. Instead of the thumb crossing under after the first three fingers, we wait until after the fourth, which plays the black key of B flat. The thumb will then pick things up on C, with the scale ending on the top F with finger 4. Just like the other scales, the reverse fingering is used on the way down. Once you get to the thumb on C, finger 4 crosses over to play B flat, finishing up with 3-2-1 on A, G, and F.

C major G major F major

The thumb turn, along with the crossing over of finger 3 (or 4 in the F major scale) is a major C major G major F major part of playing the scales. This technique will also be used in the next chapter as we begin to move the hands around a bit in playing some great songs.
There are many more major scales—you can begin a major scale from every white and black key on the keyboard. We don’t have space to show them all here, but you can check extras out my companion volume, The Pop Piano Book (also published by Hal Leonard Corporation) for more information and fingerings for all the major and pentatonic scales.